
by John Ewing
Over the past several weeks I’ve discussed how I go about selecting locations and tracking weather for my work, as well as key tools landscape photographer should have, and have discussed my image capture process. Now I’d like to take a look at image processing and cover a few basic techniques that I use on a regular basis. First, I’ll start with corrective adjustments, which are essentially used to fix misadventures that could have ideally been managed in the field. Next time, I’ll review interpretive adjustments used to enhance and build upon the basic image.
Before I get started, I should provide some detail on my workflow. I use Adobe Camera RAW (ACR) to complete basic global adjustments (i.e. white balance, contrast, initial sharpening, and color adjustment) before opening images in Photoshop (PS) for global fine tuning and local adjustments. Finally, in the spirit of full disclosure, I learned these techniques during my MFA program at AAU in courses such as Contemporary Landscape and Digital Imaging. If you are familiar with ACR and PS, you know that there are a number of ways to accomplish virtually everything. With this in mind, these tips and techniques are not offered as a definitive process, but merely as a way to share how I work. If you aren’t familiar with ACR and PS, there is a wealth of information on the internet, including fantastic tutorials on the Adobe website.
Leveling Horizon Lines: One of the most basic corrective actions is fixing a tilted horizon line. If you’ve forgotten your bubble level, or had to shoot hand-held, this is an easy fix in ACR using the Straighten Tool found in the menu bar; click on the icon that looks like a little bubble level, or uses the shortcut by hitting “A” on your keyboard. To fix your horizon, select the tool, then click-and-drag the tool along your horizon line to create a reference line. It will automatically rotate your image to level the line that you drew and provides a crop box to adjust the image. If you have a really difficult, undulating horizon line, you can also use this to set a vertical line to square the image. To do this you can use a telephone pole or the edge of a building. The longer sample line you can provide, either horizontal or vertical, the more accurate your results will be. Once you’ve identified your reference line, hit Enter and you’re done. Note, this is a cropping adjustment and your image size will be affected; how much depends upon how drastic the correction is.

Using the Straightening Tool
Simulating a Polarizing Filter: This adjustment can provide some of the look of a polarizing filter in event you forgot to bring it along, particularly in darkening a blue sky. You can also use this adjustment to enhancing color saturation, and adding contrast to clouds, but it works best with a clear blue sky. Note, this won’t replace a physical polarizer in removing specular highlights or removing reflections from shiny objects. This adjustment is also completed in ACR. On the Tool Panel, click on the HSL tab and select the Luminance tab. Next select the Targeted Adjustment Tool, the icon looks like a target next to a plus sign (keyboard shortcut “T”). Place your mouse pointer over your sky and click-and-drag down to darken. This will affect all areas of the image in the same color range, so be sure to check the entire image, and not overdo it.
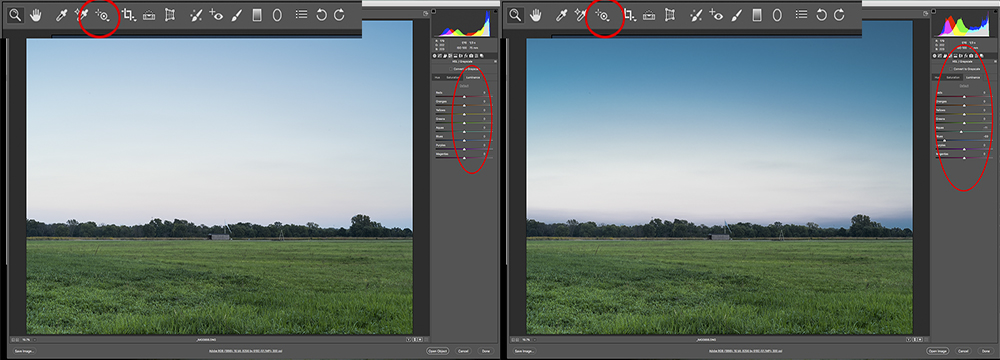
Using the Targeted Adjustment Tool
Simulating a Graduated Neutral Density Filter: This is one corrective adjustment that I use with nearly every storm image I create. I also use it often as an interpretive adjustment, which I’ll cover next time. This adjustment can be applied in ACR during initial processing, or can be added via an adjustment layer in PS where you can control the effect a little more. In ACR, select the Graduated Filter tool in the menu bar, it looks like a graduated filter, or hit “G” on your keyboard. In the Tool Panel, decrease your exposure by 1 to 2 stops to start with, then click in the middle of your image about halfway between the top and your horizon line, and drag down into the lower third of the image to apply the effect. You’ll end up with two parallel horizontal lines. The area above the green dotted line shows the full effect of your adjustment, below the red line, there is no effect. Between the lines is the transition zone. You can drag the lines up and down to determine where the transition begins and ends to achieve the effect desired; you can also adjust the intensity of the exposure change. You can also drag this adjustment at different angles, or from the bottom to accommodate your requirements. Hit Enter when you’re done. Note: as with the previous adjustments, when done in ACR, you can always come back and modify later.

Simulating a Graduated Neutral Density Filter, Before & After
I’ll frequently use a graduated filter to add this effect in Photoshop in conjunction with a layer mask when I want to limit the effect to specific areas, most notably when I have structures in the foreground silhouetted by the sky and want to darken the sky and not the buildings. In this situation, I’ll usually create the effect using a Brightness/Contrast or a Curves layer. Start by selecting the Gradient Tool, this looks like a gradient filter turned sideways, or hit “G” on your keyboard. Next select the Quick Mask mode (keyboard shortcut “Q”) and click-and-drag in your image to create the mask. Note: the red area in Quick Mask mode represents the area that will be masked (hidden), so drag from the bottom, up. If you don’t like the way the mask looks, select Edit>Undo, or “Command + Z” on your keyboard, and try again. When you’re happy with the mask, exit Quick Mask (keyboard shortcut “Q”) and you’ll see the “marching ants” selection. Next create new Brightness/Contrast adjustment layer (my preference in most cases, but you can also use a Curves layer) and adjust the effect as desired. If you want to mask a portion of the adjustment (as previously mentioned), simply create a selection of the item you want to mask, make sure your layer mask is active, and fill with black.

Simulating a Graduated Neutral Density Filter Using a PS Adjustment Layer
Perspective Correction: This adjustment helps eliminate some of the perspective distortion that is inherent in wide angle lenses. When needed, this is generally the last adjustment I will make prior to resizing and sharpening for printing. In PS, select the Perspective Crop Tool, it looks like a warped grid and is collocated with the normal Crop Tool, or just hit “C” on your keyboard. You may need to hit “C” again to toggle between the regular Crop Tool and the Perspective Crop Tool. Click-and-drag from the top left corner of your image to the bottom right corner to select the entire image. When you do this, PS lays out a grid across the image with drag handles in each corner and along each side. Using the corner grab handles, adjust the grids to align with horizontal and vertical lines in the image (i.e. horizon line and/or roof lines for the horizontal axis, and sides of buildings, telephone poles, or trees for the vertical axis.
Once you feel like you have everything lined up, hit Enter. It is best not to try to correct all the distortion, rather, aim to get the perspective close to normal. Trying to fully correct may cause unexpected artifact that looks worse than the initial distortion. If you do make the image worse, hit Command + Z and try again. Also, remember that this is a cropping tool so you’ll lose some of your image in the process. Further, if in the course of making your corrections you drag one of the handles outside of your original image dimensions, you’ll end up with blank spots that you’ll need to fill or crop out.

Perspective Crop Tool, Before & After
I hope these techniques are of some use to you. As I mentioned at the beginning, the tools I discussed are just one of multiple possible ways to accomplish these adjustments, and you may already have a process that works better with your overall workflow. The main idea is to find what techniques will work best for you. Next time, I’ll be looking at interpretive adjustments in PS.