Alaskan Photographer, Wayde Carroll

by Kirsten Belloni

Two weeks ago I was headed home from Cambodia.  I boarded the plane for the last leg of the trip feeling groggy from many hours of travel, and already fighting the 19 hour jet lag.  As I got to my seat, exit row middle, I stowed my bag and made the briefest eye contact with the passenger seated next to the window.  I’m shy and generally don’t talk to people on airplanes.  It’s terrible I know, but I prefer a big personal space bubble and being shoulder to shoulder with a total stranger for hours is never fun. 

About the time that flight attendants started passing out pretzels and drinks the passenger by the window, a middle-aged man, pulled out his computer and started working on something.  I glanced over out of curiosity and noticed that he was in Photoshop and editing pictures of interiors.  All of a sudden my one recessive extrovert gene started to arise and I before I knew it, “Are you a photographer?” leapt from my mouth.

I was fortunate to have been seated next to Wayde Carroll, very accomplished photographer from Anchorage who specializes in commercial and editorial work.  We talked for a bit and exchanged Instagram connections.  I reached out to him for an interview this week.  The following are his thoughts and personal experiences as a professional photographer and an Alaskan.

What led you to study photography and do you think having a formal education has helped your career?  How many years have you been a professional photographer?

“I was playing music in bands in the Bay Area and working a full-time job. At 25 I realized I didn't want to end up in the career I was in and knew I couldn't count on "making it" as a musician so I decided to go back to college. My boss was very supportive and let me work any schedule I needed to keep going to school, regardless of the fact that I wasn't pursuing anything in the field of my current job. I started taking business courses because everyone said I should. I wasn't interested in that and switched my major to music. I decided I didn't want a career as a studio or symphonic musician either and switched over to an art major.

I took a photography class as an elective at San Jose State and it became obvious pretty quickly that this was the medium for me. I graduated when I was 30 and still didn't really consider a career as a photographer. It was a few years later when I stopped playing music full-time that I knew I had to do something different. My girlfriend at the time, now my wife, always wanted to teach in a Native village in Alaska. I told her that if she got a job I'd go with her. We ended up in Eek, Alaska, pop 300. It was there that I decided to start focusing on photography. It seemed like a career in which I could be creative but also possibly earn a living. It took another eight years to finally go "full-time" but it has been well worth it.

Unfortunately San Jose State had just started it's photo program when I was there so I feel my education could have been better. I learned nothing about how to actually run a business etc. That said, the school got me into photography and it changed my life. So, yes, I feel a formal education was very helpful. It was a great experience to be working with other students and be exposed to new art and new ideas as well. I think some of the really good schools would have been beneficial. That said, I learned the most by working for other photographers and making mistakes on my own.

I have been a full-time professional for 12 years now. I started relatively late! It's the best decision I ever made.”

On your website you reference leaving your "real job."  What were you doing for a living prior to making photography your full time profession?

“I worked as a "precision machined parts inspector" working in the Aerospace and computer industries in the Bay Area. A job I fell into, starting at the bottom as an 18 year old with a summer job. I was also playing music regularly but you couldn't say I was making a living off of that.”

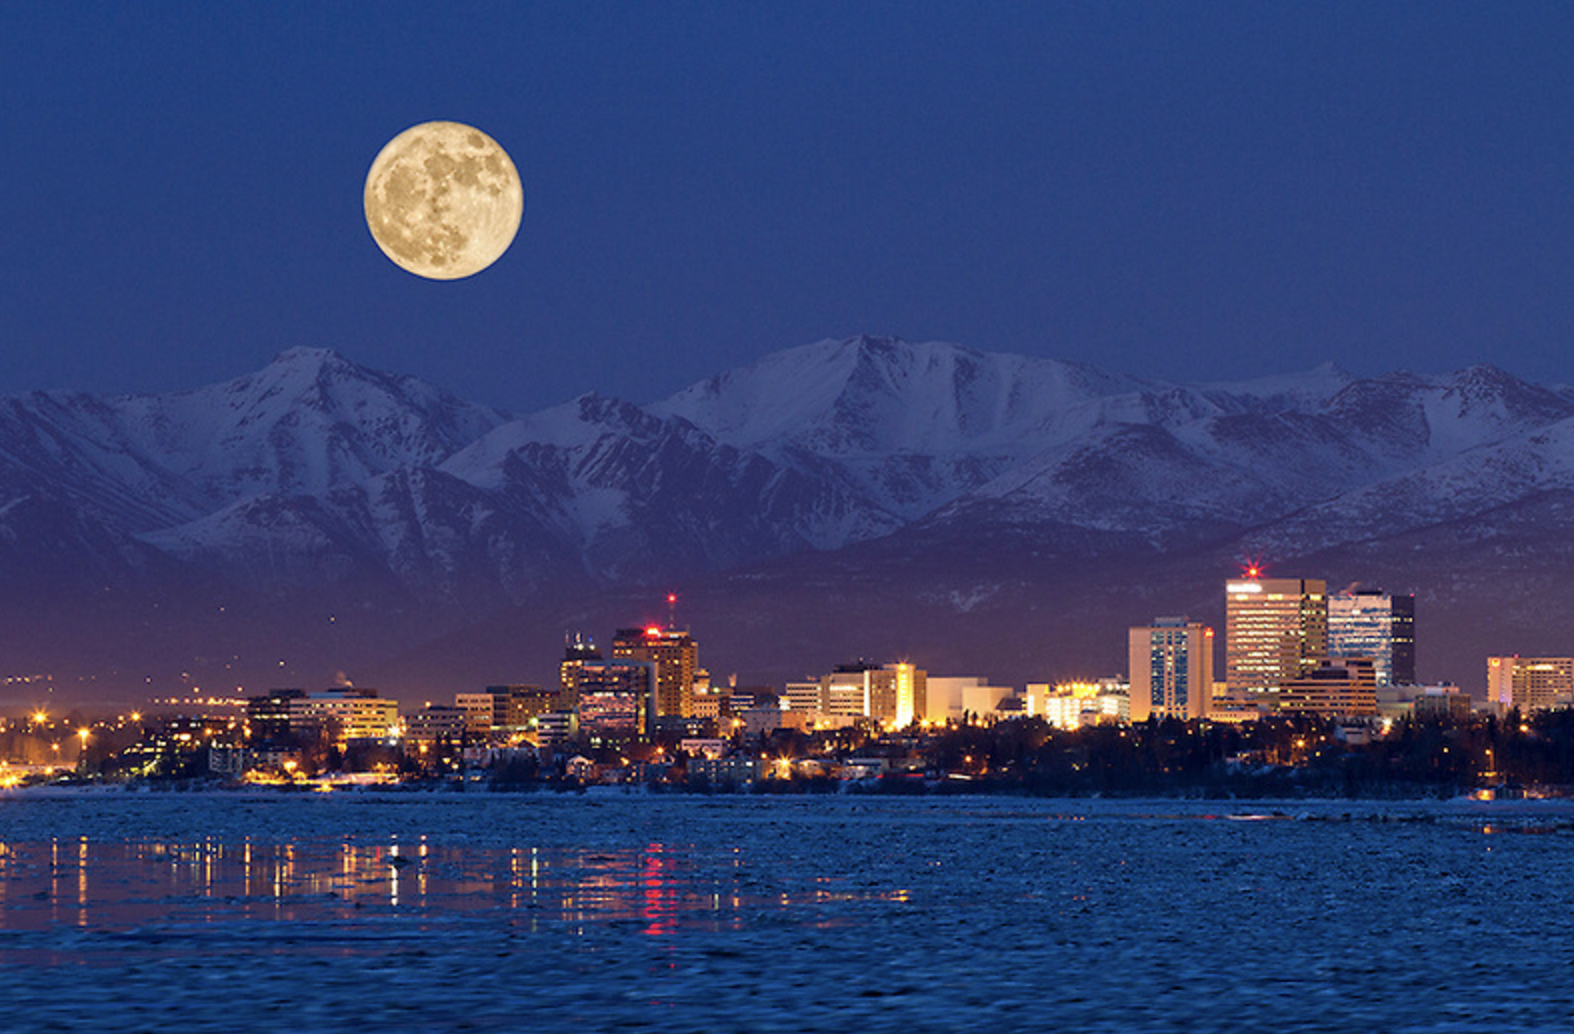
You've lived in Alaska since the early 90's.  How do you think life as an Alaskan has shaped your career?

“We've lived in AK twice now. Three years the first time and going on 11 this time. We moved back up once I had worked for other photogs etc. back in California and I felt ready to go out on my own. From our first time living here I felt it would be a great place to start my business with plenty of room for new photographers. My mentor, Clark Mishler, who I worked with the first time we lived here, told me "There is always room for another good photographer". I clung to those words and decided to come back to Alaska when I was ready. 

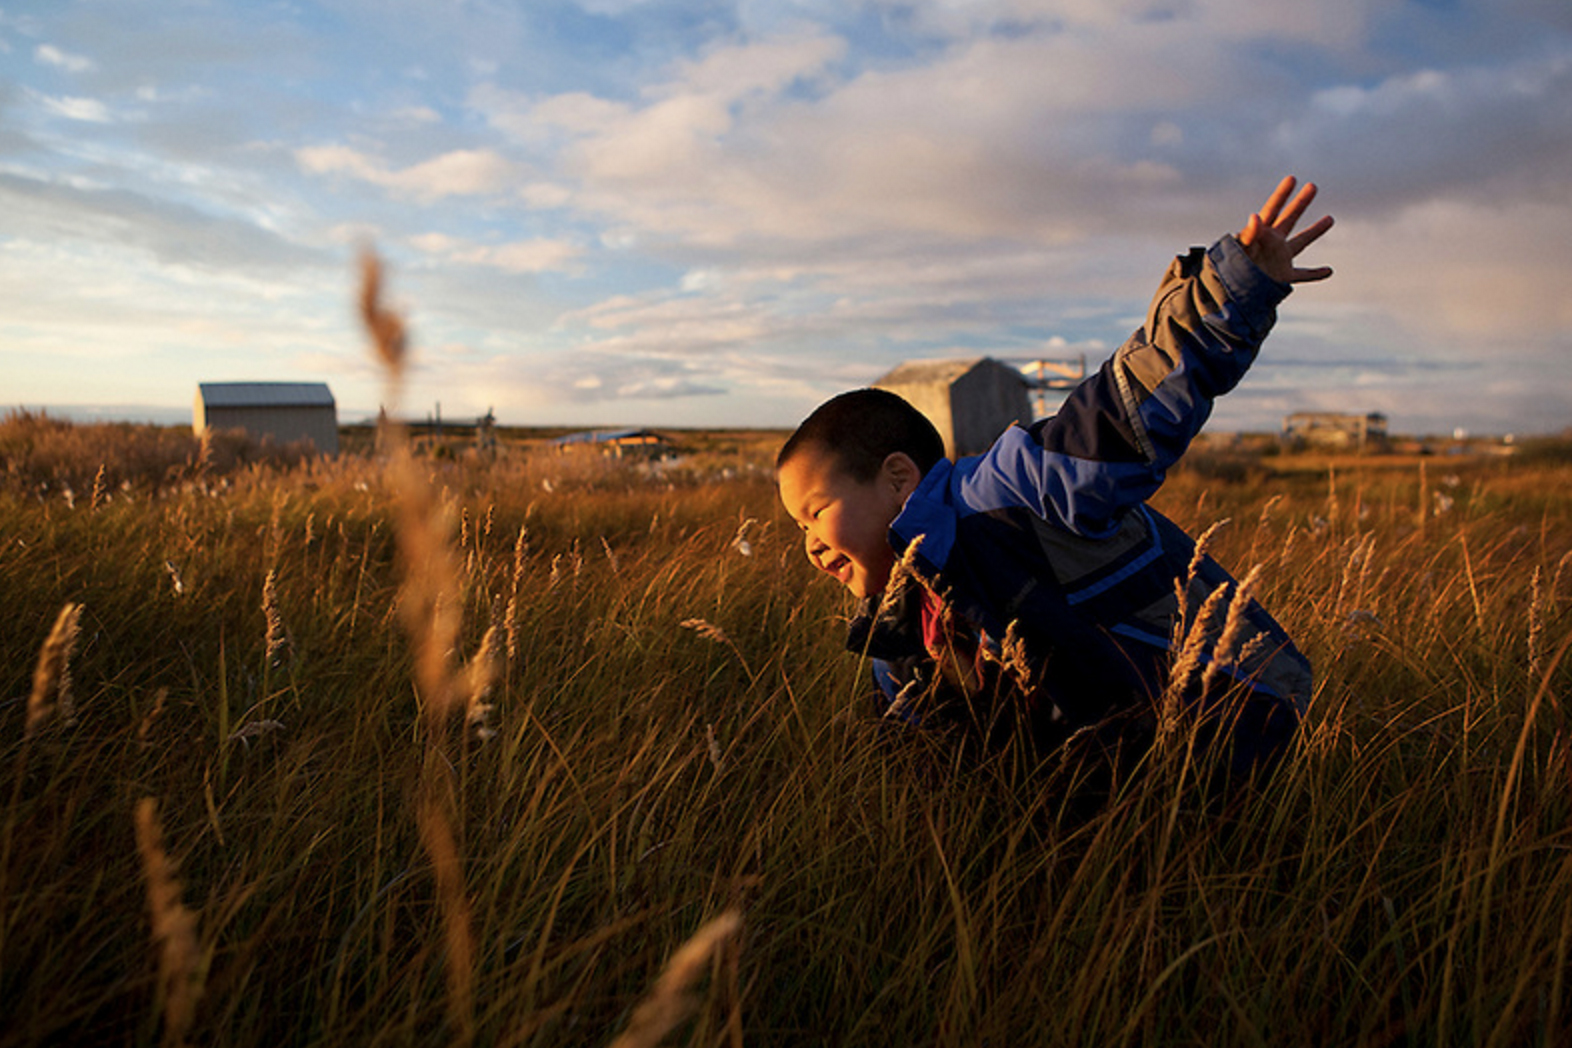
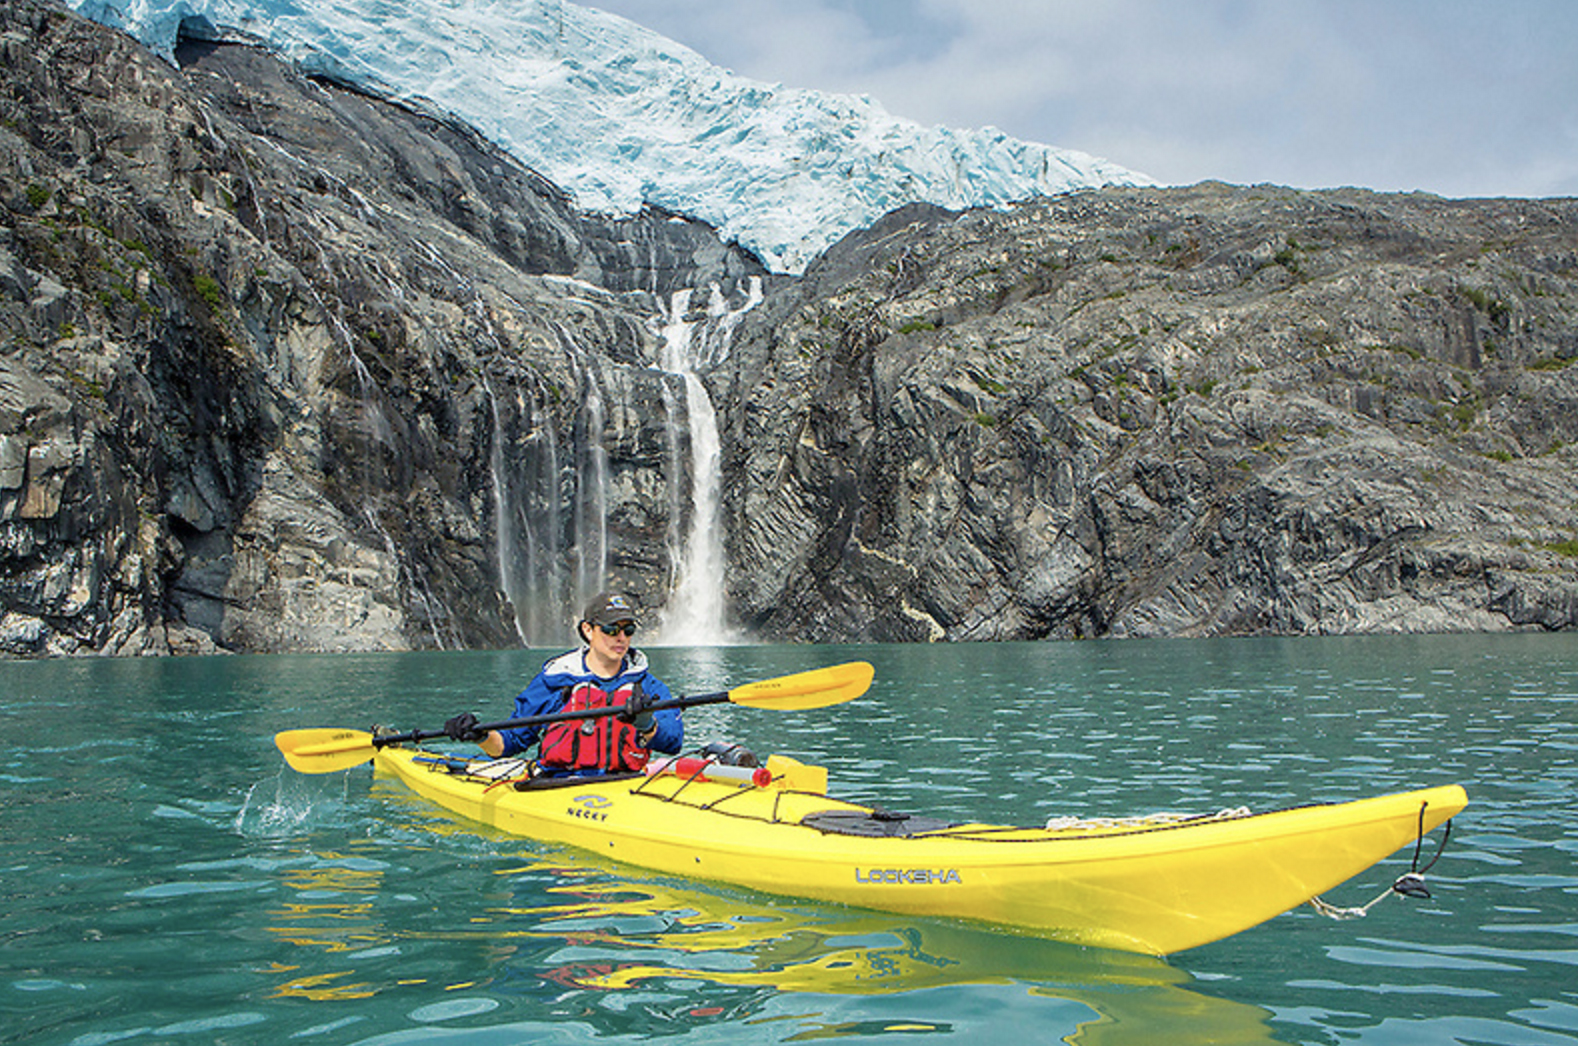
It has turned out better than expected. Being in Alaska has given me the most incredible photo opportunities. I have had commercial and editorial assignments take me all over the state. This state is filled with such amazing opportunities that are unique to our country.

2.jpeg

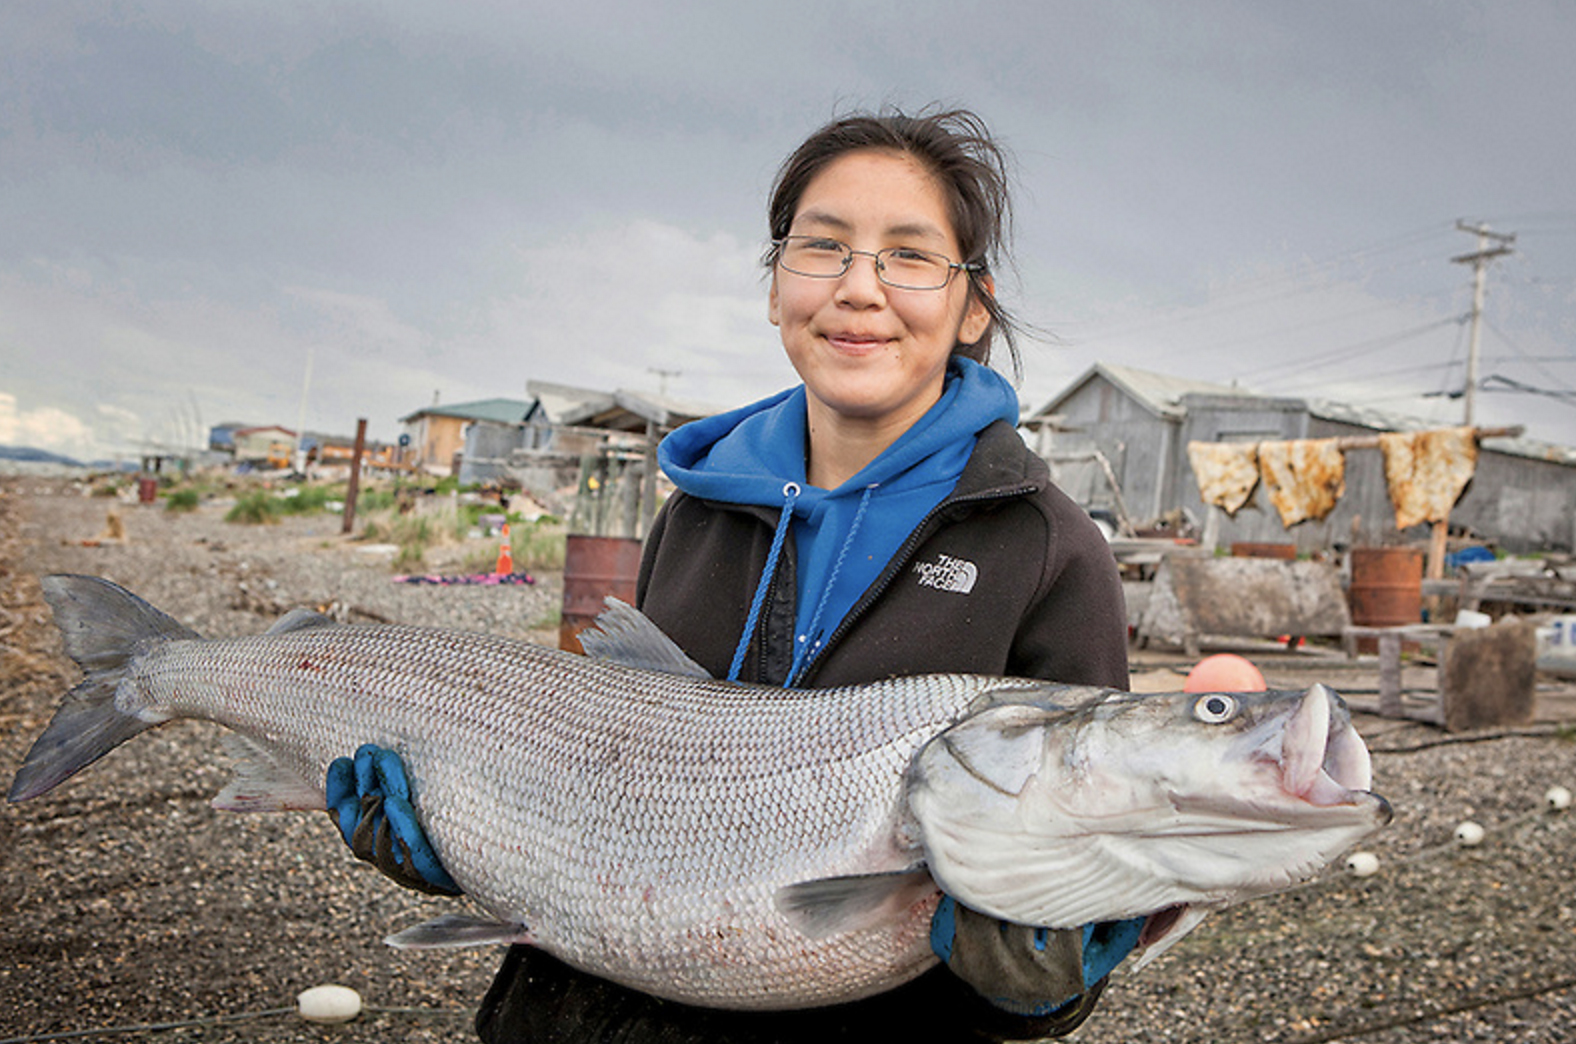
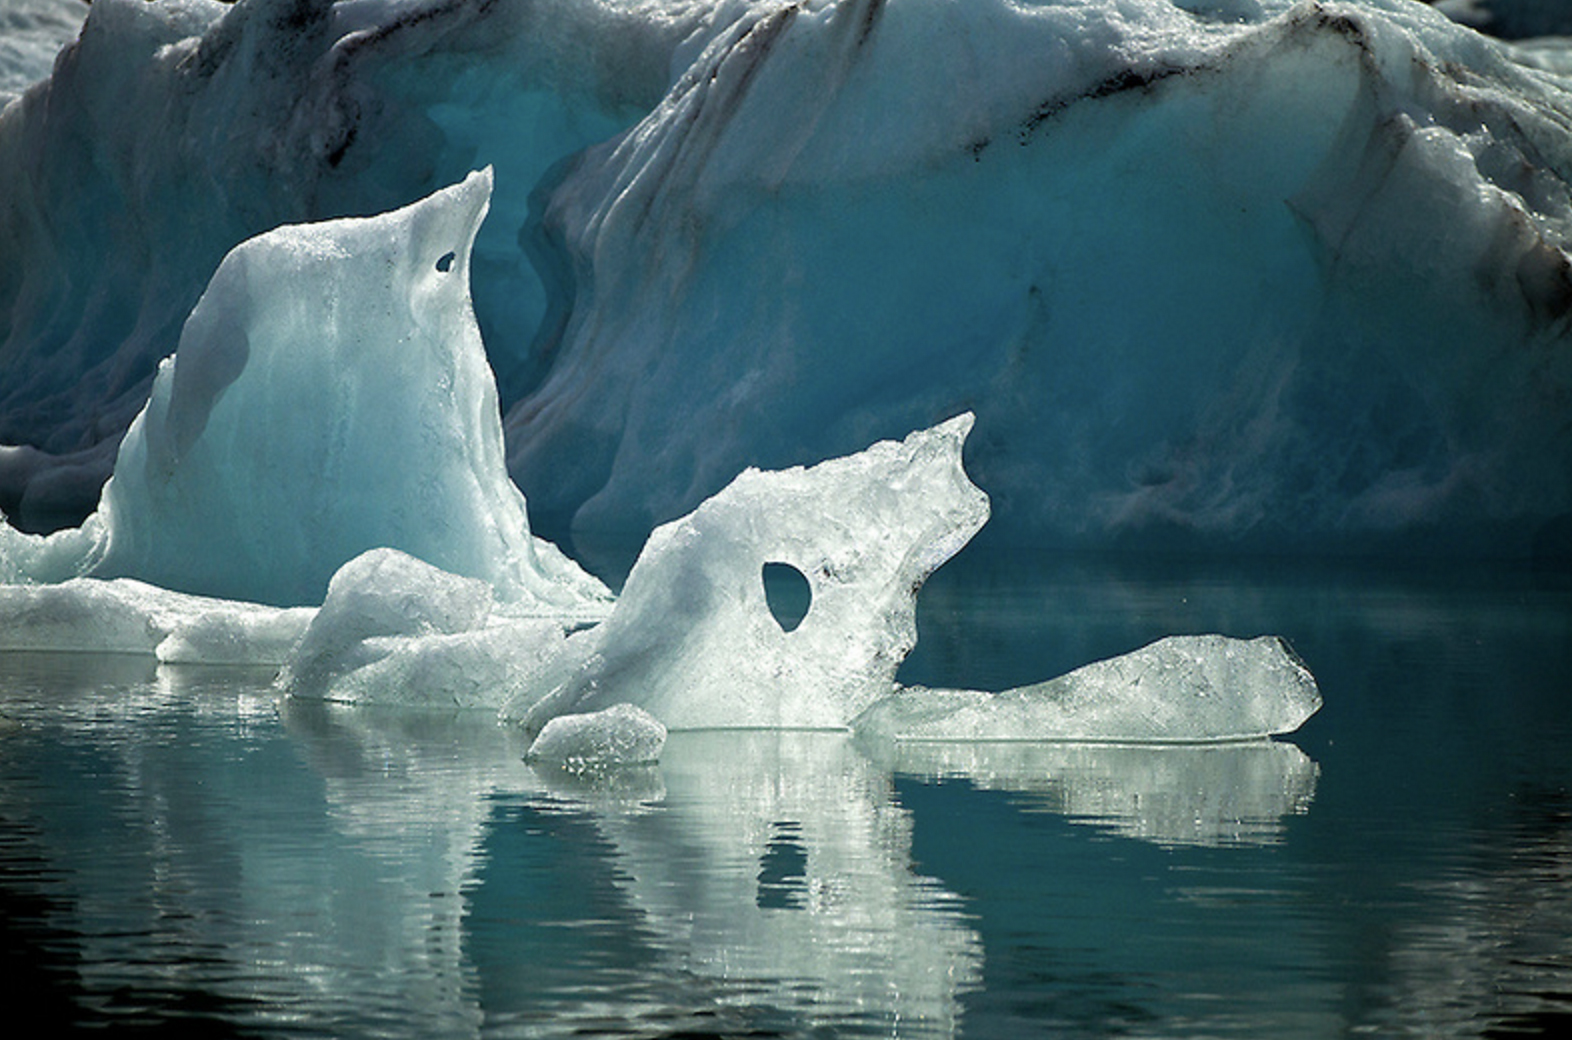
Native villages,wild areas, extreme weather and lifestyles. Another mentor, Tom Bol, recommended me to lead my first photo-tour and that has changed my life as well. I now lead trips around Alaska and the world. Something I never considered. I think Alaska will continue to be an amazing place to be a photographer. With Global Warming, the oil issues, etc. there's going to be an interest up here for a long time.”

Tell me about your most epic Alaska photo shoot.

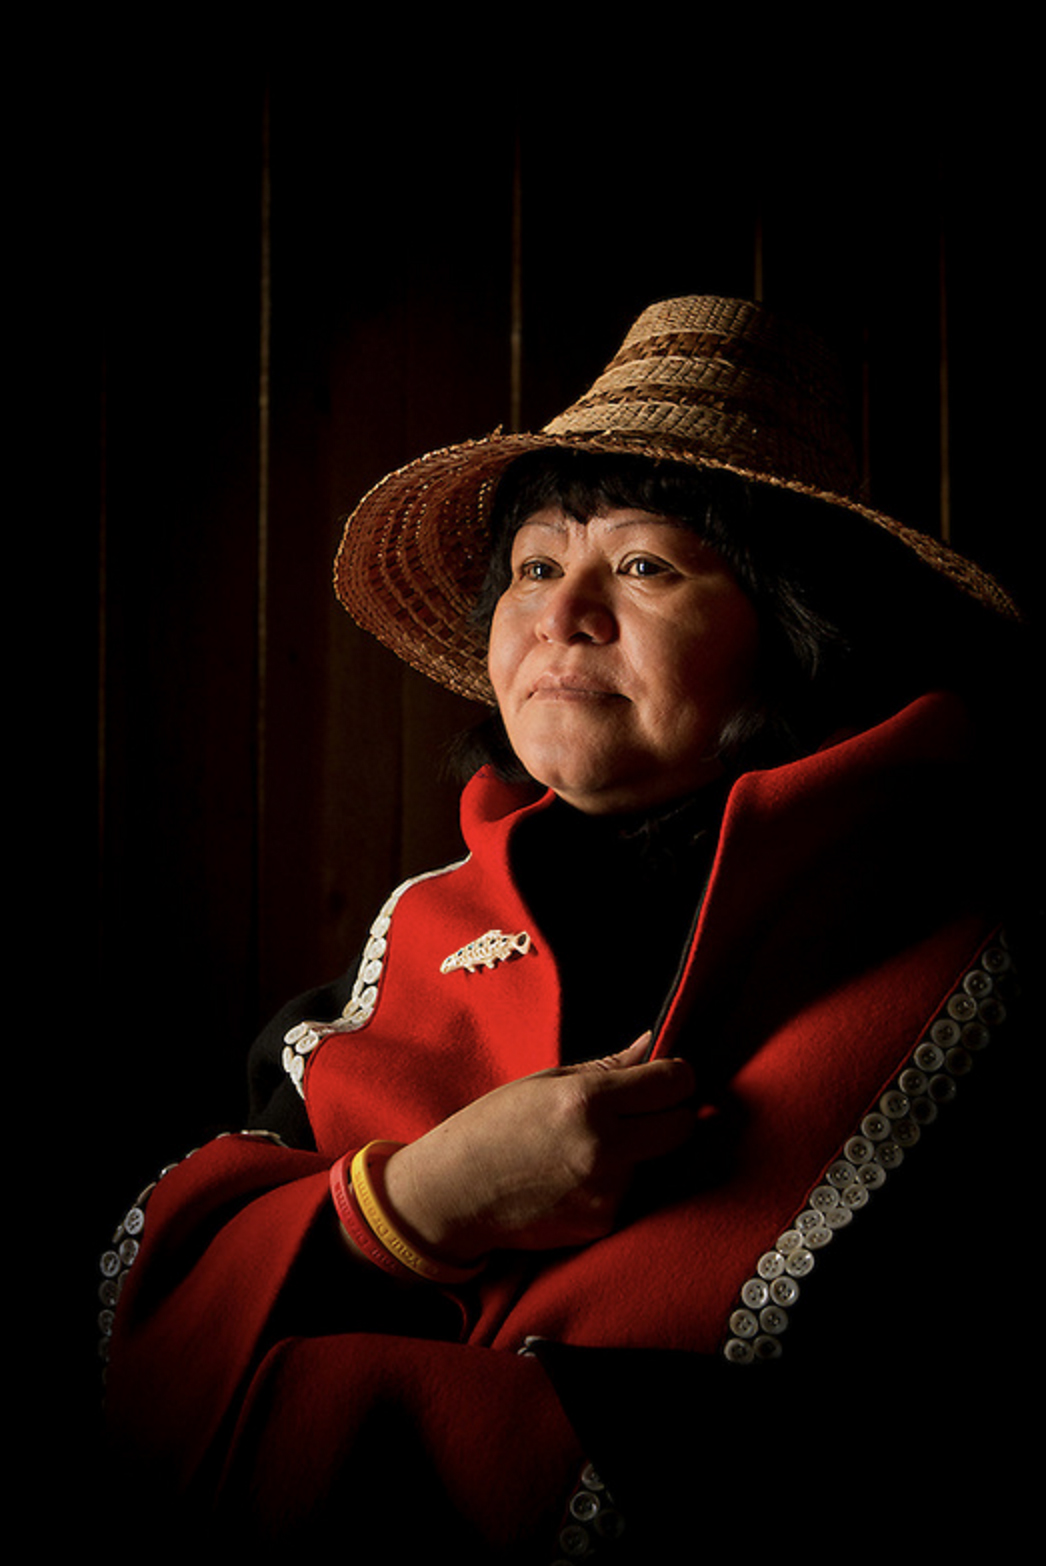
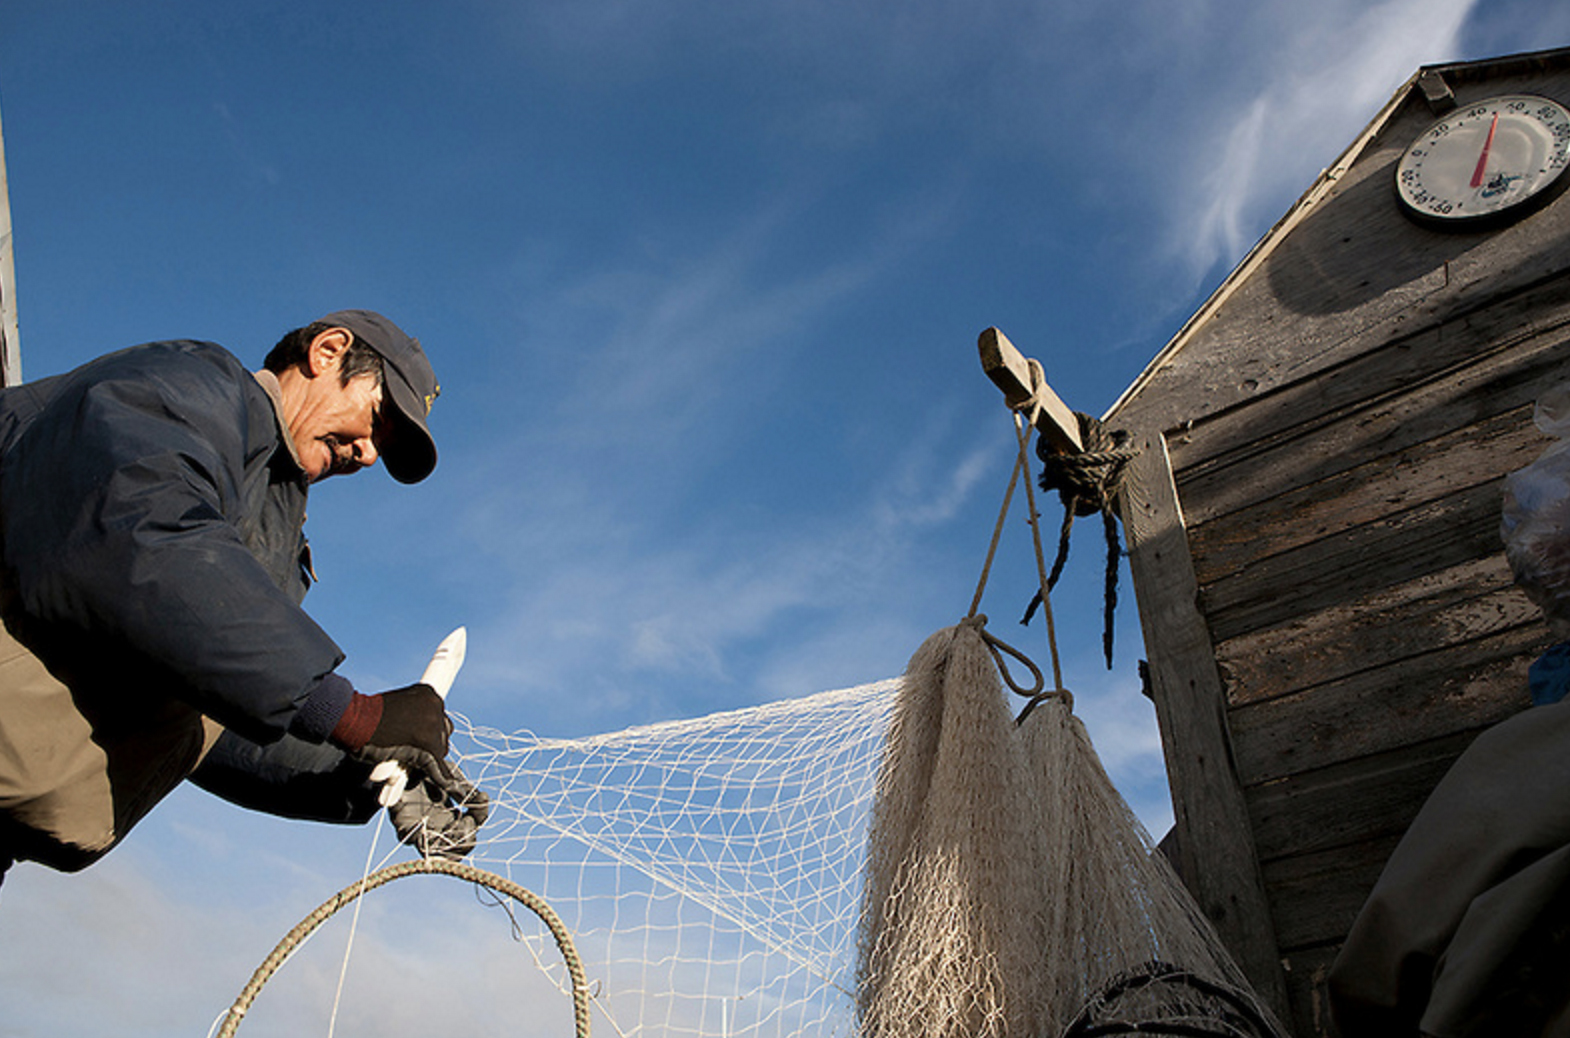
“I've done a lot of photo essays on native villages out in the bush and that's probably my favorite kind of work but my most epic assignment was a six week project I was awarded to document life on the Alaska Ferry System. I was commissioned to photograph activities on the ferry's themselves, as well as locations, history etc. at every ferry stop from Cordova down to Kodiak. It was a dream job.”


In recent years you have been leading photo tours all around the world.  What led you to that?

“As I referred to above, the first time we lived here I did some assisting for Tom Bol, now a Nikon Mentor. He had been leading photo tours for Alaska Wildland Adventures (AWA). Right after I moved back to Alaska Tom called me up and said he was going to recommend me to take over for him at AWA - he was moving on to bigger things. I interviewed with AWA, got the job and my first summer back I was leading my first trip. On that trip I met the owners of Journey's International and they asked if I was interested in leading trips for them. Before I knew it I was going all over the place! An amazing and unexpected addition to my career. I really enjoy leading the trips and so far it seems people enjoy being on them. I now set up a lot of my own trips as well as still work for AWA for one trip each summer.”

We discussed Ireland briefly on the airplane, what are some of the other countries that you've done tours to and what do you look for when selecting a tour location?

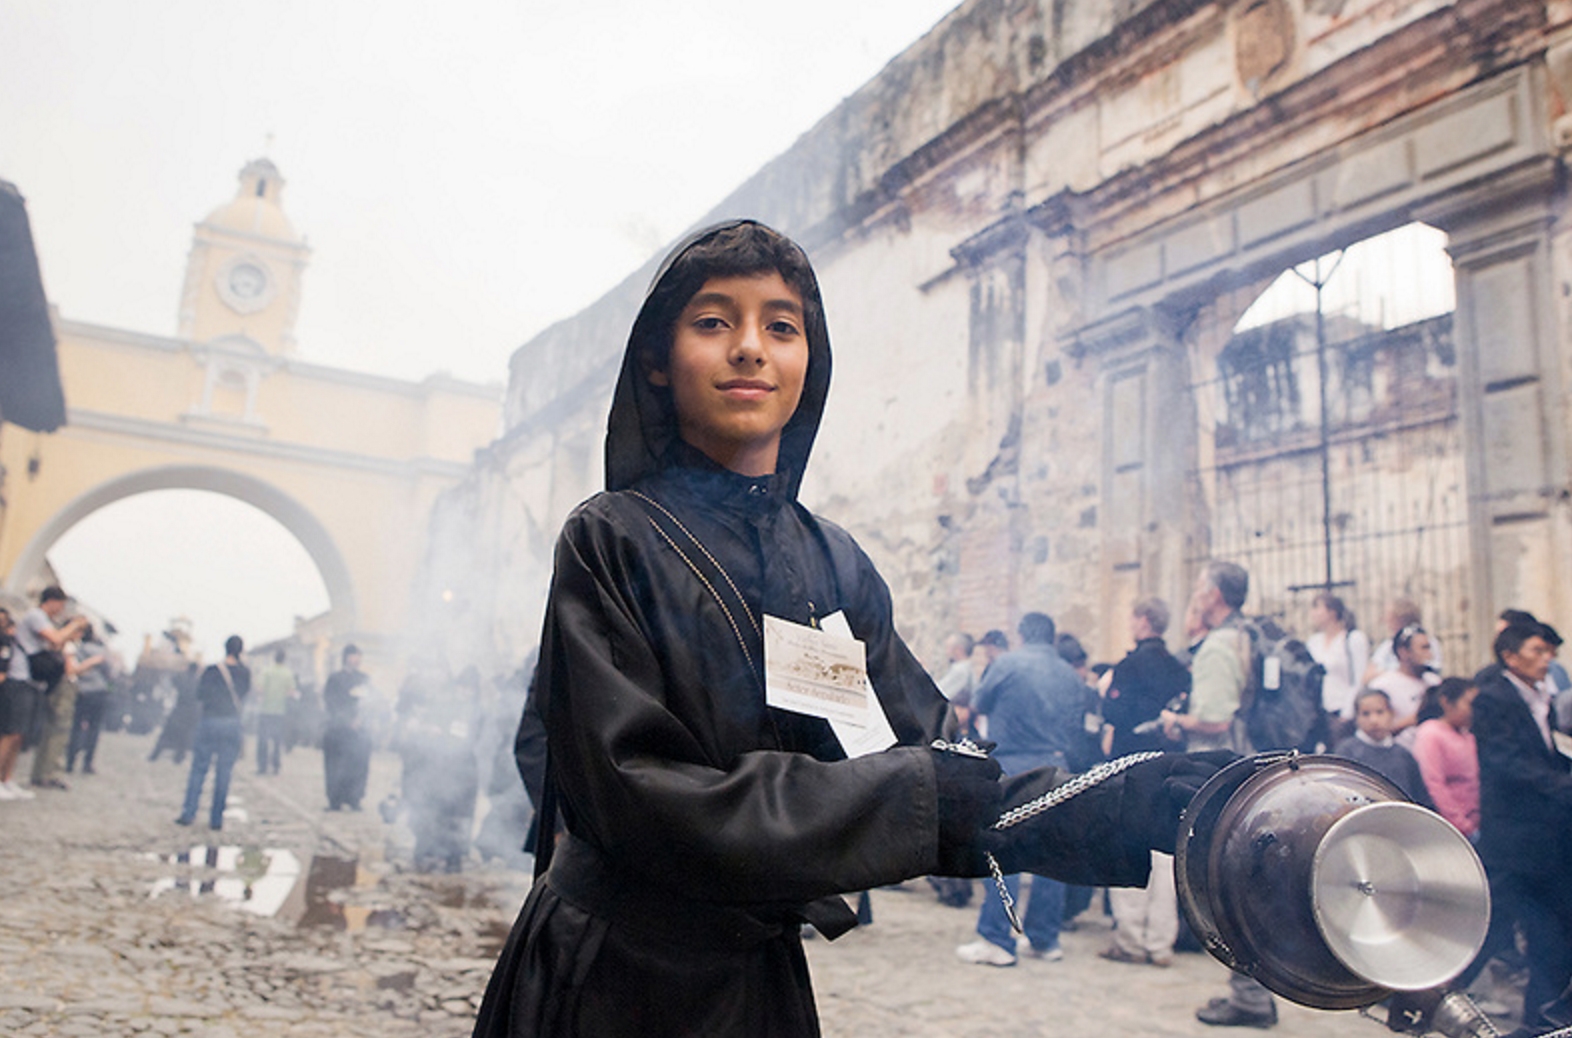
“So far I have done a variety of trips in Alaska and California. Internationally I've lead trips in Costa Rica, Guatemala, Tanzania, Ireland, and Japan this coming April. I look for places that are exciting to me, places I'd like to go. Also, if I know a few people who are interested in a place I will look at designing something specifically with them in mind. I have many clients who have been on several trips with me now so sometimes we have a discussion on "where next?”.  I always make sure to have local guides along who know the customs, best places for food etc., and are expert at finding wildlife. I am working on new trips to Nepal and Uganda right now.

What do you think is the biggest challenge facing professional photographers today, specifically in the genres that you specialize in (commercial, editorial, lifestyle/travel, etc).

“To me the biggest challenges are keeping up with the new ways of marketing yourself. Social media etc. Also, with the advent of digital photography there are just a ton of great photographers out there so there is a lot of competition. The younger generation really know how to give themselves strong presence on line and with social media. Keeping up with new technologies is fun but time consuming as well. You really have to wear many hats to run your own photography business.

I think there will always be a need for commercial photographers who actually know lighting, how to run a shoot, scout locations etc. There are so many great shooters capturing travel and lifestyle images that I think it will be a little tougher to make a steady income there. You see a lot of photographers doing workshops and tours now to make up for lost income in those areas, especially stock photography.”

You are the Program Chair for the American Society of Media Photographers (AK Chapter).  What role do you think professional memberships play in a photography career? 

“Yes, I have been the program chair for ASMP but we're having trouble keeping interest in this small community. The nature photographer's group has much more success.

That being said, Organizations such as ASMP are important. Not only do they keep you informed on current trends in photography but they invest considerable time and money into fighting for photographer's rights, especially in the realm of copyright laws etc. They also set a standard for professional business practices that are incredibly helpful when running a business on your own. It's a way to be connected to photographer's around the world.” 

“Overall, being a photographer has been the most interesting and rewarding profession I can imagine. Photography has changed my life in ways I couldn't have imagined. Having a career that you love, I think, is one of the most important decisions a person can make. I'll never be rich, but I'm not trudging away waiting for retirement. I'm doing what I plan on doing until I can’t any more!

To see more of Wayde’s work:
follow him on Instagram at https://www.instagram.com/waydecarroll/?hl=en
or check out his website at http://www.waydecarroll.com/


New New New Topographics

by Jody Lepinot

When I started photographing houses in my suburban neighborhood, and realized how much I loved doing that, I thought I was weird. Who takes pictures of that? Then I was introduced to the exhibit called “New Topographics:Photographs of a Man-altered Landscape” and I was inspired. Not only did I discover that suburban architecture was actually an “OK” subject to photograph, I realized that what I was doing (and still do) has a history.

As I read more about New Topographics, I found that although this exhibit in 1975 wasn’t a big hit at the time, it was a critical turning point for landscape photography. Although many called itboring and banal, the Ansel Adams kind of approach to photographing pristine landscapes was no longer the only way to think about landscape photography. It was time to photograph what “is” in the landscape where we live, “at the interface of nature and culture”.[1]

Over the next decade or so, these “dead-pan” scenes of suburban tract houses, telephone booths, and commercial buildings began to be seen as intentionally neutral to allow a range of interpretations. With more passage of time, the New Topographics became something people called a style, rather than an important departure from the past. [1] Today there are many people photographing in a style that can be loosely called “new topographics”. There are groups on Flickr called “Neotopografia”, “New Topographics”, “The New Topographics”, and many more related groups. Many people are photographing non-populated scenes of houses and other everyday structures and objects, often in formal compositions. I’m attracted to this style and this work.

I began musing on how the New Topographics exhibit has influenced landscape photography today beyond just adoption of the style, and discovered some very interesting work. On a website called Places (https://placesjournal.org/explore-places/urbanism/), I found Peter Keyes. He created a project called “Still Life with Cone, Standpipe and Caution Tape”. This body of work is about the temporary barricades that you see in the city to keep people from danger. These structures are as everyday as can be. In fact, most people really don’t notice them other than to avoid them, but they create some curiously interesting shapes. “Most barricades are highly tectonic, revealing all of their parts and articulating their nature through the means of deployment. In contrast, some barricades manifest as facades that conceal the underlying structure…Barricades have inherent formal qualities, but our perceptions of them are shaped by context, both physical and cultural. It is impossible to see a barricade in a museum without wondering whether it is a functional barrier or an art installation…Barricades are much simpler than intentional works of architectural design, and that very simplicity allows us to see their multiple meanings — functional, personal, cultural — so clearly.”[1]

I hadn’t seen a compositing approach to new topographics until I found the work of Lauren Marsolier. She has four projects: Transition - parts 1 through 3, and Dislocation. Marseilles’s images are formally composed landscapes that show the interface between nature and culture as the new topographic style suggests, but they are “created from multiple photographs captured in a variety of locations, each composition is shaped slowly, over time, layer by layer, through trial and error. This approach allows her to represent the world photographically without showing a specific place, focusing instead on a mental experience…A subtle combination of multiple perspectives, lighting sources, and distances is used to produce disorientation in the viewer. The landscapes are ambivalent, familiar and yet not identifiable. The work probes our relationship to a globalizing world, marked by the loss of its certainties and an overall sense of placelessness.” [2]

My last example of how new topographics has been taken in new directions, is Warren Kirk’s “Westography”. This is a genre he created. Kirk gives us a humorous look at sculpted shrubs and peculiar cars and trailers in front of houses, as well as shops with odd architecture and/or colorful signage…popular subjects in the style of new topographics. Another departure, in addition to humor (rather than the usual dead-pan approach), is the inclusion of people in some of his images. Kirk considers his work to be “social landscape” images. Kirk says that his motivation is preservation, not unlike the Bechers. “The beauty of the suburbs (in Melbourne, Australia) is being ripped out. Progress is inevitable, but I’m inspired to capture the last of it before it’s gone. One way or another, it will go.” [3]

References:

[1] New Topographics, Center for Creative Photography, University of Arizona, George Eastman House International Museum of Photography and Film, Steidl, c. 2009, pp. 69-80 (essay by Alison Nordstrom
[2] https://placesjournal.org/article/architecture-of-barricades/
[3] www.laurenmarsolier.com
[4] https://seekerofthelostarts.wordpress.com/2014/05/02/meet-warren-kirk-the-westographer-of-melbournes-fading-suburbs/

Lumen Printing With a Twist

After a break for the Winter Intersession, we're back with weekly blog posts! As instructors and students alike prepare for the semester, here's some alt process inspiration from MFA student, Natalie van Sambeck.

Lumen print with digital negative on expired AGFA Portriga-Rapid Baryta paper.

by Natalie van Sambeck
All images are created by the author unless noted otherwise.

When we think of lumen prints we think of photograms exposed with the sun but have you every tried making them with a digital negative? I have personally tried this with some pretty interesting results and wanted to share my process with everyone.

I will explain the process in greater detail for those of you new to lumen printing. Perhaps you are bit confused. Rest assured the process is extremely simple. Even more appealing is that there is no darkroom necessary for this process. Although you will need a few items to get you started. But before we get into what you need I want to explain what lumen prints are.

As I previously mentioned, lumen prints are photograms made with the sun. Photograms are simply camera less pictures made with light sensitive material that are then exposed to light. Traditionally, photograms that require photographic paper are carried out in a darkroom. Lumen prints do not. The standard way of making lumen prints are with plant cuttings. Although any translucent material will yield you excellent results as they will give you greater tonal range in your images.

While you can certainly apply this process to create a traditional lumen print, my purpose is to share a not-so-traditional lumen printing technique with digital negatives. Both processes require similar materials. Keep in mind that like the traditional technique, the results with a digital negative will produce an image with fairly low contrast and subtle tones.

Screen Shot 2017-01-25 at 2.42.51 PM.png

So what materials do you need to get started?
• Black and white photographic paper or film. I typically use expired paper but you can use newly purchased paper too. You can find expired paper for sale on sites like Ebay for a decent price. Some people prefer to use unexposed film instead of photographic paper. The choice is really up to you.

• A contact printer. This part is essential! It’s even more important when making images from digital negatives. I personally use a contact printer because it allows you to open one side to check for exposure without moving the negative while inspecting the paper. Contact printers are expensive though so some may prefer to squeak by with a picture frame or two pieces of glass held together with clamps. The important part here is that whatever method you choose will sufficiently hold the digital negative in place. Although, I have purposely used a loosely held a digital negative in place to create a unique result. Just take a look at the image below.

• Sunlight or a UV light. In the most literal sense UV light is required to make the exposure and sunlight is a great source of UV light. Cloudy days can work but keep in mind that this will significantly increase exposure times to hours. In short, full sun is best. If no sun is present a UV light will also do the trick. Exposure times with full sun or UV light will be roughly 15-30 minutes depending on strength of the sun. This is why a contact printer is great here. You can monitor the exposure time and take away the guesswork.

• Subject. This is either a digital negative, plant material, or some other translucent object. Creating a digital negative is out of the scope of this article. Keep in mind that this is a tricky process. In my experience Pictorico brand transparency paper and a good digital printer are essential for good results. Here are the basics for creating a digital negative. First pick an image to print. Then open the image in Photoshop, convert the image to black and white, apply a curve, and invert the image to a “negative.” Don’t forget to flip your image horizontally so that you don’t have a reversed printed image. Please not that variations in the black and white and curves adjustments will impact the quality of the image. You really need to experiment with this part of the process to find which adjustments will yield the best results. More information on creating digital negatives can be obtained online.

• “Darkroom Equipment.” While you don’t need a darkroom to create these images you will need some darkroom equipment to create your images. More specifically, you will need at least 2 developing trays, tongs, and containers to hold the mixed chemicals. In terms of chemicals you really only need fixer but some people like to also archivally wash their images. Note that neither chemical is required for a lumen print but fixer is mandatory if you want to keep the image. Without fixer the lumen print will fade with time. If planning on fixing the image, you will need a tray for the fixer and another for water. You will need an archival wash and tray for processing if you choose to include this in your steps as well. Finally, some people use a toner for their images to prevent the image from significantly fading after being fixed. I have not personally used this process but wanted you to be aware of this as I do think it would be beneficial when using digital negatives. Keep in mind that toning is done before fixing and you will need additional trays, tongs, and containers for storage. Also you will need an additional water tray before you tone.

• Film changing bag. This is really only useful if you aren’t processing the images directly after exposure. I personally process after exposure because I like to work this way. However, if you are doing multiple exposures or don’t have the time to process right away, you will need a film changing bag of paper safe box to store the developed images in until you can fix them.

Now that you have acquired your materials and printed out your digital negatives you are ready to begin! Assuming you will be processing directly after exposure it would be wise to set up your work station. Have you chemicals mixed, trays out, and filled with the appropriate chemicals in the following order; Fixer, wash, water.

Once everything is in order, place the digital negative and photographic paper into the contact printer. Note that this step does not need to be done in the dark. However, subdued low light is best to prevent the paper from completely exposing before having contact with the negative. In short, do not do this step in the sunlight outside.

When setting up the contact printer, the digital negative should go in first showing the correct image when seen through the glass. If the image is reversed you placed the digital negative in the contact printer on the wrong side. Also note that using two negatives will produce the best results when working with lumen prints. Take great care to align the negatives together if working with two. While two negatives aren’t always necessary, I find that it yields the best results.

Once the negative is in place you will add the photographic paper with the light sensitive side down. If this is done improperly you will not get an image. Note that the type of paper used can alter the results. In my experience fiber based paper yields better results with a negative that has higher contrast while an RC paper yields better results with a lower contrast negative. If you want to add a little variety to your image, you could try wetting the paper prior to exposure as this thechique can also yield interesting results (see Lumen print with digital negative on expired AGFA Portriga-Rapid Baryta paper above). If you choose to do this please note that it will ruin the negative since negatives should never get wet.

Once everything is placed correctly, close the contact printer and place outside in the sun for exposure. Exposure times vary due to the strength of the sun and time of day. Another reason why a contact printer comes in handy.

Once you have determined that the print is sufficiently exposed, take the image inside in subdued light, and take the paper out of the contact printer. I like to scan my print into the computer at this stage because the colors yield some interesting results that will fade and change once fixed. This isn”t necessary but if you see the two images below you will immediately notice the difference in colors. The first image was scanned in before being fixed while the second is the final “fixed” result.

Once scanned I put the image directly into the fixer for about a minute depending on fixer brand and paper used. Make sure to read the directions specific for your fixer and paper. Once you place the image in the fixer you will immediately see the colors change. Agitate the paper (pick the tray slightly so the water runs through the paper) for the designated time and place in the wash for roughly 3-5 minutes. Again, this depends on brand and paper. Finally place the image in water for 5-30 minutes. RC paper only needs 5 minutes while fiber paper requires 30 minutes in the water. Hang up to dry and viola! You have just successfully completed you first lumen print with a digital negative!

Screen Shot 2017-01-25 at 2.44.04 PM.png